Click on the "Enter CRN's" button ![]() on the toolbar and the CRN Summary screen will appear. Alternatively, you could click on "Data Entry" on the menu and select "CRN Details". Both methods achieve the same result.
on the toolbar and the CRN Summary screen will appear. Alternatively, you could click on "Data Entry" on the menu and select "CRN Details". Both methods achieve the same result.
This is an extremely powerful screen. It allows the user to track the progress of a CRN precisely and can view the data in many different ways to determine its exact position in the process. Remember, the panel at the top of the screen has short cut icons for user convenience. A hint will appear when the cursor is positioned over them. They are:
|
Close Screen |
The Pointing Finger Button. Returns to banner page
|
|
Edit
|
Click on the Edit Button once the required record has been highlighted and its details will be made available for amendment. Hint: A "double click" on the CRN line will also invoke the edit screen.
|
|
Print Reports
|
Click on the Print Button. Prints those records highlighted by a "Yes" in the print column of the summary screen. This is set on by clicking on the print column of those records required to be printed.
|
|
Add New CRN |
Click on the "+" button. This will create a new CRN.
|
|
Delete CRN |
Click on the "-" button. This function will delete the highlighted CRN from the EdiSoft data base if it does not have a CRN Number.
|
|
Copy a CRN |
Click on the "++" button. This is similar to the template function in the data entry pull down menu but doesn't create a permanent record with a status of Template. It is generally used to redo a record that was sent with incorrect information that cannot be changed once a CRN Number has been allocated.
|
|
Transmit/Receive
|
This will send all queued CRNs. Only CRNs will be sent. However all incoming records from previous transmissions CRNs, EDNs, RFPs, PRAs etc. will be processed. The tables that relate to the incoming messages will be updated. |


Grid Title Buttons
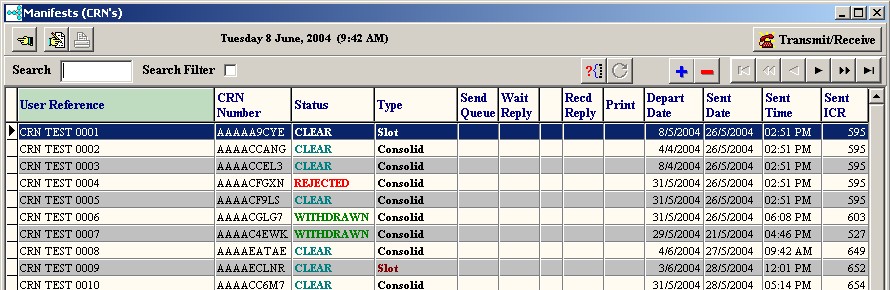
The CRN's are displayed in a grid. The display sequence can be changed by clicking on the Title at the top of a column. In the example below, the display is in User Reference sequence and you will note that the Title is light green to indicate this is the column controlling the sequence.
Search and Search Filter
![]()
Search allows users to find a record quickly by entering all or part of its controlling column value. The Filtered Search restricts the summary display to only those records that satisfy the search criteria, i.e. all records with a reference starting with a particular order number.
Navigator Buttons
![]()
On the top right of the screen there are several short cut buttons to take the user to the first, next, last or previous records.
Matters Pending

The above example shows only a CRN that is waiting on a reply from Customs. As previously mentioned, the summary display can be sorted on any column sequence. There is a difference. If the "Send Queue" column is chosen, only those records that are waiting to be sent will be displayed. The "Wait Reply" will only show those that have been sent but no reply has yet been received. The "Recd Reply" shows those for which a reply has been received and the corresponding message has not been read. To read the message text click on the "Yes" in this column. Once read, the "Yes" will be turned off but you can still display the message by clicking on the blank "Recd Reply" column for the required record or via the Messages folder within the data entry screens. Only the last message received will be kept removing the need for the user to delete error messages.
Add a New CRN
Click on the ![]() button. There will be a short delay while the new record is being created and then the CRN Details screen will be displayed.
button. There will be a short delay while the new record is being created and then the CRN Details screen will be displayed.

This detail data entry screen will be displayed when either editing or adding a new CRN. The nature of the data requires each record to have one Header record and the possibility of multiple Line Items. The fields have been “folderised”. Each folder contains groups of related information. Progress through the folders and enter the required data. Press the TAB key or use the mouse to move to subsequent fields. Although it is possible to enter the information in any sequence, it is logical to complete the header information first and then click on the line items folder and progress through them one at a time.
Start by entering a User Reference. This User Reference must be unique. If an attempt is made to use a User Reference that has been used before, the Customs EXIT2 system will reject the CRN. Therefore EdiSoft does a quick check for you to prevent obvious errors. This check does not include CRN's that have been archived.
![]()
Now press the Tab key (on the keyboard) and the cursor will move to the next control.
Start by entering a User Reference. This User Reference must be unique. If an attempt is made to use a User Reference that has been used before, the Customs EXIT2 system will reject the CRN. Therefore EdiSoft does a quick check for you to prevent obvious errors. This check does not include CRN’s that have been archived.
Now press the Tab key (on the keyboard) and the cursor will move to the next control.

In this case CRN Type. Key the first few characters of the CRN Type and a drop down menu will appear. Key sufficient characters for the required CRN Type to be highlighted (or use the arrow key on the keyboard). When the CRN Type is highlighted, press the Tab key.
Hint when using lookup controls. You can click on the small arrow to cause the list to drop down and then find the required record by keying in the first few characters of the name or description. If the cursor is in the field already then just key in the first few characters and the list will drop down automatically.
Fill in the remaining fields in the Header Details folder, pressing the Tab key to move to the next one.
Eventually the screen will look something like this. Note that it is not always necessary to fill in all the fields.
Add new Line Items by clicking the ![]() button. This is Line Item 1 and can be seen in the Line Item Column. Press the Tab key once to move focus to the Type of Line field and select a Type of Line.
button. This is Line Item 1 and can be seen in the Line Item Column. Press the Tab key once to move focus to the Type of Line field and select a Type of Line.
The options here are
| • | Contingency Customs Authority Number - This is for a BCP Number obtained during an ICS outage. |
| • | Customs Authority Numbe - This line refers to a CAN that has been previously obtained. |
| • | Exempt Code - This line refers to Goods that are exempt. (EX.. Codes). |
The entry in the Reference Number field will be conditioned on the Type of Line that is selected.
Where the Type of Line is CAN, enter a valid CAN or use the ![]() button to select an EDN from the EDN
button to select an EDN from the EDN
Summary Screen. If the EDN was obtained from a source other than EdiSoft then the EDN Number will need to be entered.
Where the Type of Line is Exempt Code then select the screen will look like this
Select the Reference Number from the dropdown list and then fill in the remaining details.
Hint regarding New Line Items. There are two ways to create a new Line Item. The single button ![]() will create a new Line Item that is empty, you need to enter all the details. The
will create a new Line Item that is empty, you need to enter all the details. The ![]() button will create a new Line Item and copy all the details from the highlighted Line Item to the new Line Item. You then need to make only those changes that are different in the new Line Item. You can then make changes to these items in the new Line Item without changing the details in any other line item. This data is only copied at the time a new Line Item is created. Any changes at som e later time will require changes to each individual Line Item.
button will create a new Line Item and copy all the details from the highlighted Line Item to the new Line Item. You then need to make only those changes that are different in the new Line Item. You can then make changes to these items in the new Line Item without changing the details in any other line item. This data is only copied at the time a new Line Item is created. Any changes at som e later time will require changes to each individual Line Item.
When you have entered all the details then click on the ![]() button. EdiSoft will do a quick check for obvious errors and display any of these In the Validation Messages in the Messages folder. These errors must be corrected before trying to send a message.
button. EdiSoft will do a quick check for obvious errors and display any of these In the Validation Messages in the Messages folder. These errors must be corrected before trying to send a message.
When you become more proficient, you will use the ![]() button. This button will do the Validation and if there are no errors, it will Close the Details screen and Queue the CRN for transmission.
button. This button will do the Validation and if there are no errors, it will Close the Details screen and Queue the CRN for transmission.
See Sending and Receiving CRN’s for the next step.